
Chapter 21 - Understanding Coding and APIs in AI Systems
- Zack Edwards
- 2 days ago
- 31 min read

What Coding Really Does in an AI Workflow
What Coding Really Does in an AI Workflow – Told by Zack Edwards. When I first began working with AI systems, I didn’t realize how simple the core idea really was: coding is nothing more than giving a machine instructions, step by step, in a language it understands. You don’t need to be a master programmer to see how it fits together. Coding is the translator between your imagination and the machine’s ability to act. Without it, AI is like a brilliant student sitting silently in a classroom—full of potential, waiting for someone to ask the right question.

Why Coding Matters in a World Filled With AIWhenever I show students how AI works, they’re surprised to discover how much control they already have. Coding matters because it lets you shape what AI does, rather than letting the AI decide on its own. A few lines of code can tell the AI to summarize a book, answer a customer question, sort information, or build an entire interactive experience. Coding gives you the steering wheel. It turns AI from a mysterious black box into a tool you command.
Turning Human Thoughts Into Machine StepsThe magic behind code is that it breaks your goals into tiny pieces the computer can execute one after another. When you write code, you’re creating a recipe. If you want AI to help run a business, assist a student, or generate a video script, you must give it precise steps. Code tells the AI what information to take in, what rules to follow, and what form the output should take. It’s not the AI that decides how to behave—it’s the code you write that shapes the path.
How APIs Allow Your Code to Talk to AITo connect your code to an AI model, you use something called an API, which stands for Application Programming Interface. Think of an API as a messenger. Your code hands the messenger a request—like “Write a summary of this text” or “Generate an image based on this description”—and the messenger carries it to the AI model. The AI does the work, then sends the response back through the same messenger. This allows your software, website, or game to use AI’s intelligence without needing to store or create the model itself. You simply send instructions and receive answers.
Putting It All Together in a Simple WorkflowImagine writing a small program that asks the AI to turn a paragraph into bullet points. Your code collects what the user typed. It passes that text to the API. The API delivers it to the AI model. The model processes it and returns the bullet points. Your code shows the result to the user. Just like that, you’ve built something useful. Even with simple scripts, your code becomes the conductor of an orchestra, guiding AI to perform exactly the task you want.
Empowering Anyone to Create With AIThe most exciting part is that you don’t need years of experience to start. Beginners can write meaningful AI-powered tools with just a little code. Whether you’re building a chatbot on Replit, experimenting in Google Colab, or making API calls through Postman, you are stepping into the role of designer. Coding gives you the power to turn ideas into working systems. It’s how you shape AI so that it serves your goals, your stories, your business, or your students. And once you understand that, the entire world of AI opens up in front of you.
My Name is Margaret Hamilton: Lead Software Engineer for NASA’s Apollo Program
My name is Margaret Hamilton: Lead Software Engineer for NASA’s Apollo Program. If you had told me as a young woman studying mathematics that I would one day help land humans on the Moon, I might have laughed. My ambitions were clear but modest: I wanted to understand the world through logic and numbers. Programming was not yet a profession, and “software engineering” was not yet a phrase. But I found myself drawn to the emerging field of computing because it combined the precision of mathematics with the creativity of problem-solving.

Finding My Place at MIT and Entering ApolloMy journey toward Apollo began at MIT’s Instrumentation Laboratory. I first worked on early defense-related systems, writing code that needed to be correct the first time. Those experiences taught me something essential: human lives depend on how carefully we build software. When NASA partnered with the lab for Apollo, I joined the team that would create the flight software for the Command Module and Lunar Module. I didn’t fully realize it then, but I was stepping into the most challenging and exhilarating work of my life.
The Weight of Responsibility and a New Kind of EngineeringApollo was not just a program. It was a promise—a promise that humans could accomplish what seemed impossible. To keep that promise, we had to build systems that would not break under pressure. Computers of the 1960s were tiny in comparison to today’s power, so our code had to be efficient, reliable, and absolutely correct. I coined the term “software engineering” because I needed people to understand that writing software required the same discipline as building hardware. We needed structured design, rigorous testing, and careful planning.
I remember working late nights surrounded by printouts taller than I was, checking every instruction by hand. Every line mattered. Every assumption had to be challenged. There was no room for mistakes.
The Day the Alarm Saved the MissionOne of the stories people often ask me about happened during the Apollo 11 landing. Minutes before touchdown, the computer began flashing a series of alarms: 1201 and 1202. What most of the world didn’t know was that the software was doing exactly what we designed it to do. The guidance computer was overloaded with radar data that wasn’t essential for landing. Instead of failing, the system prioritized the most important tasks and shed the rest. It kept the astronauts safe, stable, and on course.
That capability came from years of insisting that software must account for the unexpected. It came from arguing that humans make mistakes and that our systems must protect them. When Neil Armstrong and Buzz Aldrin landed on the Moon despite those alarms, it was the moment that validated everything I had fought for.
Lessons from Apollo and the Value of Failure PreventionPeople tend to focus on Apollo’s triumphs, but what defined my work were the failures we prevented. I insisted on introducing safeguards, simulations, and rigorous test environments. One incident that shaped this approach came earlier in the program when my young daughter accidentally played with a simulator and triggered a sequence that could crash the spacecraft in flight. Many argued that astronauts would “never” make such a mistake. But humans do what humans do. We updated the software to ensure such an error couldn’t occur during a mission.
I learned that anticipating human error was not cynicism; it was compassion.
Building a Legacy Beyond the MoonAfter Apollo, my work continued into many other projects, including building systems that could adapt, learn, and recover from failure—early ideas that connect surprisingly well to modern AI and automated systems. But Apollo remained the foundation. It taught me that software is not just code. It is responsibility. It is foresight. It is the invisible architecture that holds everything together.
Looking Back with Gratitude and PurposeWhen I look back at my life’s work, I don’t think of myself as a hero. I think of myself as someone who believed in careful logic, in the power of teamwork, and in the importance of preparing for the unexpected. My contributions may have been behind the scenes, but they were built to serve a mission shared by thousands.
Your First AI Script: Python + Google Colab – Told by Margaret Hamilton
Your First AI Script: Python + Google Colab – Told by Margaret Hamilton. When I first began writing code for spacecraft, our machines filled entire rooms and required immense caution with every instruction. Today, students can open a browser tab, write a few lines of Python, and interact with an AI model more capable than anything we could have imagined in the Apollo era. The tools are different, but the principle is the same: clear instructions written carefully can shape the behavior of a machine. Let me walk you through how to begin that journey with your very first AI script.

Starting a Python Notebook in Google ColabGoogle Colab is a friendly environment for beginners. It removes the complexity of installing software and lets you focus entirely on the code itself. To start, you simply open a new notebook at colab.research.google.com and click “New Notebook.” You will see a blank code cell waiting for your instructions. This cell is your flight computer—every line you write will guide the machine through its next task.
Running Your First Python ScriptBefore involving AI, it’s helpful to run a simple Python command to get comfortable. Type the following into the cell and press Shift+Enter to execute it:
Python: print("Hello from your first Python script!")
When the output appears below the cell, you have taken your first step. You’ve given an instruction, and the machine has responded exactly as asked. This small success mirrors the earliest moments in my own work—testing tiny bits of code to build confidence before moving on to more complex systems.
Preparing Your AI Environment with the OpenAI SDKTo speak with an AI model, you need to install the OpenAI Python package. In a new cell, run:
Python: !pip install openai
This command equips your notebook with the tools it needs to communicate with the AI service. Next, you must import the package and set up your API key. The key identifies you to the system, much like mission credentials for a spacecraft. Never share it publicly.
Python: from openai import OpenAI
client = OpenAI(api_key="YOUR_API_KEY")
Replace "YOUR_API_KEY" with the actual key you receive from your OpenAI account.
Writing Your First “Hello AI” CallNow, you can write your first instruction to the AI model. This is the moment where your code becomes a dialogue. In a new cell, try the following:
Python: response = client.chat.completions.create(
model="gpt-4.1",
messages=[
{"role": "user", "content": "Hello AI, can you greet the class today?"}
]
)
print(response.choices[0].message["content"])
Here you send a simple request, and the AI returns its own message in response. The call includes the model name, the content of your request, and the structure of the conversation. Just as our Apollo guidance computer followed priority-based instructions to determine what to do next, your program follows these steps precisely to obtain the answer.
Capturing and Printing the AI ResponseThe response returned by the system contains a structured set of data. The text you want is found inside that structure. By capturing it in a variable and printing it, you display the AI’s message clearly on the screen. In more advanced programs, you might save it, process it, or use it as input for a larger workflow. The important thing is understanding that the AI’s words come back as data your program can work with.
Why This Simple Script MattersWith just a few lines, you have created a system that communicates with a powerful AI model. You typed an instruction, the AI processed it, and you captured the result. This is the foundation of nearly every AI-assisted tool, from chatbots to research assistants to educational programs. Just as we built the Apollo flight software by testing small components and expanding outward, you now have the basis for building larger, more capable applications. Each line you write strengthens your understanding—and each experiment brings you closer to mastering this new frontier.
Building Simple Projects in Replit – Told by Margaret Hamilton
Building Simple Projects in Replit – Told by Margaret Hamilton. When I look at tools like Replit, I cannot help but smile at how approachable software creation has become. During Apollo, every line of code had to be printed, checked, and re-checked before we dared to run it. Replit offers something wonderfully different: a safe space where students can experiment freely, make mistakes, fix them quickly, and see results instantly. To begin, you simply create a new Python project. Within moments, you’re inside an environment ready to run code, install packages, and build something meaningful.

Setting Up Your Replit EnvironmentOnce inside a new Python Repl, you will see a simple file structure on the left, your code window in the center, and the console at the bottom. This is your command center. Replit automatically sets up the Python runtime for you, so you don’t need to configure anything complex. The only step before writing AI-powered code is to prepare your environment to talk to the OpenAI system. This requires installing the correct package and preparing your API key.
Installing the openai PackageIn the Replit console, or inside a new shell tab, you can install the package by typing:
BASH: pip install openai
This gives your project the ability to communicate with the AI model. In my day, adding new capabilities involved linking libraries manually, loading them into memory carefully, and hoping nothing collided. With Replit, installing a library is now a single command—an elegant simplicity we would have appreciated deeply.
Creating a Simple ChatbotOnce the package is installed, create a file named main.py and begin by importing what you need:
Python: from openai import OpenAI
client = OpenAI(api_key="YOUR_API_KEY")
Then, write the code for a small chatbot interaction:
Python: def ask_ai(message):
response = client.chat.completions.create(
model="gpt-4.1",
messages=[
{"role": "user", "content": message}
]
)
return response.choices[0].message["content"]
user_input = input("Ask the AI something: ")
answer = ask_ai(user_input)
print("AI:", answer)
With just a few lines, you now have a program that accepts user input, sends it to the AI model, and prints the response. It is simple, but it captures the essence of the dialogue between human and machine that defines modern software.
Handling Errors When They AppearErrors are not failures—they are clues. In Apollo, errors could mean mission danger, so we designed systems to prevent and catch them. In Replit, errors simply guide you toward what needs adjusting. If you see an authentication error, your API key may be missing or incorrect. If you get a module-not-found error, it likely means the openai package was not installed properly or imported with the wrong spelling. Indentation errors are especially common for beginners; Python is unforgiving about spacing, so ensure that all blocks line up correctly.
When something unexpected happens, read the error message slowly. It will almost always tell you what to fix. And if one attempt doesn’t solve it, try another. Experimentation is part of the learning process.
Turning Simple Projects Into Real ToolsWhat begins as a small chatbot can grow into something more: a homework helper, a customer-service assistant, a writing companion, or a simple knowledge explorer. Replit gives you the same freedom we valued during Apollo testing—an environment where ideas can be tested, modified, and improved continuously. Each project you build strengthens your understanding of how AI and code work together. And with each mistake corrected, you become more confident in shaping software that serves others reliably and creatively.
My Name is Dennis Ritchie: Creator of C and Co-Author of UNIX
My name is Dennis Ritchie: Creator of C and Co-Author of UNIX. I often tell people that I did not set out to change the world. My childhood was quiet, filled with the kinds of hobbies that led one toward science—not because I expected to become a pioneer, but because logic and machines simply made sense to me. My father worked at Bell Labs before I did, and perhaps some of his fascination with engineering found its way into my bloodstream. I was drawn to mathematics first, then physics, and finally the new frontier of computing that seemed to be calling out for explorers.

Finding Bell Labs and Meeting Ken ThompsonBell Labs became my home long before I knew it would change my life. It was there that I met Ken Thompson, whose energy and curiosity matched mine in a way that only happens once or twice in a lifetime. Ken had a knack for speed—he could build, break, and rebuild a system before most people finished thinking about it. I approached problems differently, preferring slow precision, a careful shaping of ideas. Together, we made a strange balance that just worked.
We met not through a formal introduction, but through the gravity that pulled curious minds together inside Bell Labs. It was an environment where someone might poke their head into your office to ask, “Do you want to help me rewrite the future of computing this afternoon?” And the correct answer, naturally, was yes.
The Birth of UNIXThe early days of UNIX were born out of necessity and curiosity rather than ambition. Multics, the large project many of us had worked on, grew unwieldy and directionless. But Ken, always restless, began building a simpler system on a discarded PDP-7. He needed a file system and basic tools. I began helping him refine and expand the system, often working deep into the night.
UNIX was built piece by piece, not through a grand blueprint, but through human intuition. Each tool solved a real problem. Each decision favored simplicity, clarity, and beauty. We wanted software that felt like a craftsman’s workbench—sharp tools always within reach, no unnecessary clutter.
It was during this time that our friendship deepened. We argued, debated, laughed, and occasionally stared at the machine until it finally gave in and worked. Those were the years when a team of curious engineers unknowingly built the foundation for everything from iPhones to supercomputers.
The Need for a Better LanguageBy 1971 we had a problem: UNIX was elegant, but the languages available to write systems were not. Assembly language made everything fragile and painful. We needed power without chaos, simplicity without limitation.
This is where C began—not as an invention but an evolution. Ken had developed a language called B, a precursor influenced by BCPL. I wanted something more structured, something that could manipulate data with ease yet still generate fast, efficient machine code. I began extending B, adding types, new operators, and a cleaner structure. Slowly, the language gathered strength.
It wasn’t until later that we realized C would escape our laboratory and spread across the world. At the time, it was only meant to make UNIX better.
C and UNIX Growing TogetherC and UNIX were like intertwined vines. UNIX gave C purpose, and C gave UNIX its voice. Every feature of the language reflected something we needed in the operating system. When I introduced new capabilities, Ken would immediately test them practically. If it slowed him down, frustrated him, or felt inelegant, it was changed.
In this way, C was shaped not by theory but by craftsmanship. We were not writing manifestos—we were writing tools.
One of my favorite memories is of realizing that C had become powerful enough to rewrite the entire UNIX kernel. As we converted the system from assembly into C, it felt like the moment a child stands for the first time, takes a few wobbly steps, and then begins to walk boldly forward.
Friendship, Collaboration, and Quiet ImpactKen and I were different in temperament, but we shared an unspoken trust. He’d dive into the unknown, and I’d be there to help shape the ideas into something refined and reliable. Many people imagine great breakthroughs coming from lone geniuses. In truth, most are born from conversation, cooperation, and a shared sense of wonder.
Our colleagues at Bell Labs—people like Brian Kernighan, Douglas McIlroy, and later many more—became part of this quiet revolution. What we built together was not flashy, but it endured.
How to Send Prompts, Control Responses, and Manage Cost – Told by Ritchie
The OpenAI API: How to Send Prompts, Control Responses, and Manage Cost – Told by Dennis Ritchie. When I examine the way modern AI models work, I am reminded of the early principles we valued at Bell Labs: clarity, structure, and efficient communication between a program and its underlying system. The OpenAI API follows those same principles. Every interaction with the model begins with a prompt, and the parameters you set determine how the model interprets and responds to your request. Once you understand these controls, you realize that working with AI is less about mystery and more about giving the machine well-formed instructions.
Choosing the Model: Selecting the Right Tool for the JobWhen sending a prompt, the first decision is which model to use. You might choose something like gpt-4.1 for advanced reasoning or gpt-5.1 for even more sophisticated understanding. In my experience, selecting the right model is similar to choosing the right library or compiler for a task. Each has its strengths. The API call simply needs you to specify:
Python: model="gpt-4.1"
This tells the system exactly which version of the AI you want to interact with, much like specifying the compiler version when building software.
maxTokens: Controlling How Much the Model Is Allowed to SayNext comes maxTokens, which determines how long the model’s answer can be. Think of it as allocating a certain amount of output space. If you set maxTokens=50, the model will give you a short response. If you allocate 500 or more, the model can generate detailed explanations. Just like managing memory or buffer sizes in earlier systems, this parameter helps ensure that your program behaves predictably and efficiently.
Python: max_tokens=200
This not only controls output length but also helps manage your cost, since each token has a price.
temperature: Shaping Creativity Versus PrecisionThe temperature parameter adjusts the variation in the model’s output. A low temperature, such as 0.1, yields more predictable, consistent answers. A higher temperature, like 0.9, encourages creativity and variety. This reminds me of adjusting the strictness of compiler optimizations—whether you want predictable machine-like precision or flexibility in how the system interprets your instructions.
Python: temperature=0.7
Choosing the right value depends on your goal. For factual answers, stay low. For brainstorming or creative writing, raise it.
system Role: Setting the AI’s Identity and Behavior Before the Conversation StartsThe system role is a way of telling the model who it should be during the interaction. This is akin to configuring the environment in which your program will run. You define expectations before the user even begins speaking. For example:
Python: {"role": "system", "content": "You are a helpful tutor who explains concepts clearly."}
This acts as a set of global instructions, shaping the AI’s tone, style, and behavior throughout the conversation. It’s not unlike initializing variables or setting mode switches at the start of a program.
Understanding Cost Through Token UsageEvery input and output token counts toward cost. A token is a small chunk of text—part of a word, in many cases. Entrepreneurs who plan to build tools with AI should think in terms of cost per token, not cost per request. If a model charges a fraction of a cent for 1,000 tokens, then shorter prompts and concise outputs save money. It’s similar to how we used to think about CPU cycles or memory usage. Efficiency matters.
If your prompt is 100 tokens and your output is 200, you pay for 300 total. Learning to compress instructions without losing clarity becomes an important skill.
Putting It Together in a Single CallHere is a simple example that incorporates everything:
Python: response = client.chat.completions.create(
model="gpt-4.1",
max_tokens=150,
temperature=0.3,
messages=[
{"role": "system", "content": "You are an efficient assistant."},
{"role": "user", "content": "Explain how photosynthesis works in simple terms."}
]
)
print(response.choices[0].message["content"])
This request sets the model version, limits the response size, adjusts creativity, defines behavior, and controls cost. The AI returns a structured answer, and your program extracts the content you need.
Why These Controls MatterWhen you adjust these parameters, you guide the model with the same precision you would apply to a well-written program. You determine how it thinks, how long it speaks, how creative it becomes, and how much it costs. With thoughtful configuration, you turn the AI into a reliable part of your system rather than an unpredictable one. Understanding these controls gives you the confidence to build tools that are efficient, predictable, and within budget—qualities that any good engineer, in any era, can appreciate.
Using Postman to Visualize API Calls
Using Postman to Visualize API Calls – Told by Zack Edwards. Whenever I meet beginners who feel intimidated by the idea of writing code, I often introduce them to Postman first. It’s a visual tool that lets you explore APIs without typing a single line of Python or JavaScript. Instead, you fill in boxes, click buttons, and watch the conversation unfold between your computer and an AI model. Postman gives you the chance to understand the structure of API requests before ever touching a code editor, and that confidence can make all the difference.

Creating Your First Request in PostmanThe first thing you do is click “New” and choose “Request.” Postman will ask you to name it and place it into a collection, which is simply a folder for organizing your work. After creating it, you’ll see a blank request window. This is where the magic starts. You change the request type to POST, then paste in the endpoint that the OpenAI model expects—something like https://api.openai.com/v1/chat/completions. The screen immediately begins to feel like a control panel instead of a code editor.
Adding the Required Headers for AuthenticationTo speak to an AI model, you must prove who you are, and Postman handles this with headers. In the “Headers” tab, you add a new key: Authorization. For the value, you type Bearer YOUR_API_KEY. This header is your badge of permission, and Postman makes it clear and clean. Beside this, you also add Content-Type with the value application/json. With these two headers, your workspace is fully prepared for a conversation with the AI.
Sending a Prompt and Watching the AI RespondNext comes the body of the request. Switching to the “Body” tab, you select “raw” and choose “JSON” from the dropdown. Then you type a simple instruction:
{
"model": "gpt-4.1",
"messages": [
{"role": "user", "content": "Hello AI, can you say hello back?"}
]
}
When you press “Send,” Postman displays the response in real time. You see a block of JSON appear on the right side of the screen, structured and readable. Inside it is the AI’s answer—your own small conversation with a machine, revealed without writing any code at all. This moment often surprises students. They realize that an API is simply structured communication.
Inspecting JSON to Understand What the AI ReturnsThe JSON response is your clearest look at what an AI model actually sends back. Postman color-codes and formats it, making it easy to explore. You can open and collapse fields, examine the model’s choices, and follow the entire structure. This teaches you how responses are organized—where the message content is stored, what metadata comes with it, and how your program would later extract just the text. Students quickly begin to think of APIs as predictable, organized systems instead of mysterious machines.
Saving Your Request as a Reusable WorkflowOne of Postman’s most helpful features is the ability to save your request. By placing it into a collection, you can return to it later, duplicate it, or build new requests that branch off the original. Over time, a collection becomes a visual library of your experiments. For students, this becomes the foundation for future coding: each saved request is a reminder of what works, how it works, and why.
Why Postman Builds Confidence Before CodePostman strips away the barriers that often keep beginners from exploring APIs. By presenting everything visually—endpoints, headers, body, and responses—it helps learners grasp the structure of communication with an AI model before they ever type a line of code. And once they understand that structure, moving into Python, JavaScript, or any programming environment feels far less daunting. Postman lets students learn by doing, and learning by doing has always been one of the most effective paths into the world of technology.
Using Make.com to Build No-Code AI Automations
Using Make.com to Build No-Code AI Automations – Told by Zack Edwards. When people first step into the world of AI, they often think they need advanced programming skills to build something useful. Make.com proves the opposite. It gives you a visual canvas where you connect circles with lines, like building a flowchart that comes alive. The moment you realize you can automate entire workflows—emails, reports, messages—without touching code, a whole new world opens up.

Creating Your First Scenario in Make.comEverything begins with a scenario. You click “Create a new scenario,” and Make.com presents a clean, empty workspace. This is where you design the automation. Each bubble you add represents a step: trigger an action, process information, or send something to another app. When you add the first module—say OpenAI—you’re telling the system, “This is where the thinking happens.” It’s a bit like building a miniature control system, but one you can assemble with clicks instead of code.
Connecting OpenAI to Apps Like Gmail, Sheets, or SlackMake.com integrates with dozens of apps, so the next step is choosing where the AI’s output should go. You might connect a Gmail module to send an email, a Google Sheets module to record information, or a Slack module to deliver a message to your team. The visual design makes it intuitive. You drag lines between the bubbles, building the connection just like you’d draw a diagram on a whiteboard. Suddenly, AI is linked directly to the tools you use every day.
Passing Inputs to AI and Sending the Result ElsewhereThe real power of Make.com appears when you configure the flow of data. Maybe you want the AI to read information from a Google Sheet. Maybe you want it to take a Slack message as input. Or maybe you want it to generate something from scratch. Inside the OpenAI module, you simply type the prompt: “Create a summary of today’s tasks and highlight the most urgent items.” When the scenario runs, Make sends that prompt to the AI model, waits for the response, and hands that response to the next module automatically.
The AI output can then be inserted directly into an email, a spreadsheet entry, a chat message, or any number of actions Make supports.
An Example: Automatically Writing a Daily Summary EmailOne of the most useful beginner projects is a daily summary email. The scenario begins with a time-based trigger—perhaps every day at 4 PM. The second module is OpenAI, where you give it the job: “Summarize today’s notes and produce a clear overview of what needs attention tomorrow.” If you have information stored in Google Sheets, you can feed those rows into the prompt. If you use Slack, you can pull recent messages into the summary. The final module is Gmail, where the AI-generated summary becomes the body of the email. When the scenario is activated, Make handles everything automatically. At the scheduled time, the email appears in your inbox, crafted by AI and delivered without any manual steps.
Why Make.com Helps Beginners Understand AI WorkflowsWhat I love most about Make.com is that it teaches students to think like engineers without requiring them to write code. They learn to break tasks into components, link those components logically, and let the system handle the execution. They can experiment, adjust modules, or add new steps simply by moving boxes around. And as their ideas grow, Make grows with them. Before long, they understand not only how to use AI but how to orchestrate it across multiple tools, turning creativity into automated systems that work quietly in the background.
Error Handling & Debugging for Beginners
Error Handling & Debugging for Beginners – Told by Zack Edwards. When students begin working with AI tools and coding environments, they often treat errors as signs of failure. In reality, errors are just messages—sometimes cryptic, sometimes straightforward—that guide you toward the next fix. During my work with students, the biggest shift comes when they stop fearing errors and start reading them. Once you understand what the machine is trying to tell you, debugging becomes less of a roadblock and more of a learning adventure.

Understanding Common Errors You Will See OftenThere are several errors that almost every beginner encounters. A 401 error usually means your API key is missing or incorrect. The system is essentially saying, “I don’t know who you are.” A 429 error means you’ve hit a rate limit—the AI model is telling you to slow down. This happens if you send too many requests too quickly. And a missing comma, or any simple punctuation error, is one of the most common issues in Python. The computer is extremely literal. If something is missing, it stops the whole process and points at the spot where it got confused.
Reading Error Messages Instead of Ignoring ThemStudents often scroll past error messages, hoping the solution will appear magically. But error messages are the machine’s way of showing you where the misunderstanding sits. If a line number is mentioned, start there. If the error names a missing module, you know you need to install or import something. If it says “invalid syntax,” look carefully at the characters around that area. The more you slow down and read those messages, the less mysterious they become. It’s like following breadcrumbs that lead directly to the fix.
Finding and Fixing Errors in Replit and ColabIn Replit, errors usually appear in the console. If it says “ModuleNotFoundError,” you likely forgot to install a package. If you see indentation errors, check that your spaces line up correctly—Python demands structure. In Google Colab, errors behave the same way but appear beneath each cell. If a key is missing, double-check that your API key was inserted correctly. If a model request fails, verify that the model name was typed accurately. Both tools highlight the part of the code that caused the issue, so you know exactly where to begin.
Understanding Errors in Postman’s Visual InterfacePostman makes error handling more visual. If a request fails, you might get a numeric code like 401 or 404. A 401 means your authorization header was incorrect or missing. A 404 suggests you used the wrong endpoint. If the body of your request is malformed JSON—perhaps a missing quotation mark—Postman highlights the error in red. Because everything is visual, beginners quickly learn how structure, formatting, and precise typing affect the entire conversation with an API.
Why Debugging Builds Real ConfidenceThe true value of debugging is not just fixing the problem—it’s building the confidence to tackle the next one. Once students learn to scan error messages, test small changes, and celebrate the moment something finally works, they begin to feel capable of creating real tools. Mistakes stop being frustrating and start becoming stepping stones. Debugging teaches patience, clarity, and resilience. And those skills stay with you long after the project is finished.
Using AI Agents, Function Calling, and Structured Outputs
Using AI Agents, Function Calling, and Structured Outputs – Told by Zack Edwards. At some point, every student working with AI reaches the same realization: the model can do far more than respond with paragraphs of text. It can call tools, run functions, and return information in clean, structured formats that a program can immediately use. These features transform AI from a conversational partner into a working teammate—a digital assistant capable of taking action inside your software.

Function Calling: Giving the AI a Set of Buttons to PressFunction calling is a way of teaching the AI what tools are available and what information each tool needs. You provide a list of functions in your code, along with descriptions of what they do. The AI then chooses which function to call based on the user’s request. It’s like giving the AI a panel of labeled switches and trusting it to flip the correct one.
For example, if your program includes a get_weather() function, you can tell the AI that this function exists and what parameters it expects. When the user asks, “What’s the weather like today?”, the AI doesn’t just generate a paragraph—it calls your weather function and returns the real data.
JSON Mode: Keeping the AI’s Output Predictable and CleanWhen a program needs to use the AI’s output directly, paragraphs won’t cut it. You need the AI to speak in structured formats like JSON. JSON mode forces the AI to return data in a precise structure, such as:
JSON: {
"temperature": 72,
"condition": "Clear skies",
"humidity": 20
}
This makes it incredibly easy for your software to read the information and use it instantly. There’s no guessing, no parsing messy text, and no confusion about what the AI meant. It’s a clean handoff.
AI Agents That Call Tools AutomaticallyAn AI agent takes the concept a step further. Instead of you deciding when to call a function, the AI itself analyzes the situation and determines the next action. The agent can call multiple functions in sequence, gather information, and then present a result. It’s almost like having an automated intern who knows which tasks to perform and when.
An agent might check your calendar, pull data from spreadsheets, draft messages, and even summarize incoming information before handing you a result. These are no longer simple responses—they’re coordinated actions.
How Businesses Use These Advanced FeaturesCompanies rely heavily on these features because they turn AI into a reliable component of a larger system. Function calling can automatically retrieve customer data, update sales records, or generate invoices. JSON mode helps structure reports, categorize emails, or produce standardized outputs for dashboards. AI agents can manage a sequence of tasks, such as pulling analytics, summarizing trends, and sending daily updates to a business team.
This combination lets businesses automate processes that once required hours of manual work. Instead of reading long messages, their systems receive clear, structured information ready to plug into databases, spreadsheets, or automated emails.
A Simple Beginner Example: AI Asking for the WeatherImagine you tell the AI: “What’s the weather today?” Instead of writing a long description, the model decides it should call your weather function. It generates a function call like:
JSON: {
"name": "get_weather",
"arguments": {
"city": "New York"
}
}
Your code runs the function, retrieves the actual weather data, and sends it back to the AI. The AI then formats the final answer for the user:
JSON: {
"temperature": 65,
"condition": "Partly Cloudy"
}
With just one question, you’ve triggered a full workflow: request → function call → real-world data → structured result. And all of it happens automatically.
When students learn these tools, they start thinking differently. AI is no longer just a writing assistant. It becomes a programmable worker—one that understands tasks, executes functions, and produces clean outputs your software can depend on. With function calling, JSON mode, and agents, beginners can build powerful systems that once seemed reserved for expert developers. And that’s when creativity takes flight.
Building a Mini AI Project From Scratch
Building a Mini AI Project From Scratch – Told by Zack Edwards. After learning each tool on its own—Python, Postman, Replit, and Make.com—the most exciting step is combining them into a single working project. A complete workflow helps students see the full power of AI development: testing ideas, writing code, creating a functional chatbot, and finally automating part of the experience. The project we’ll build is an AI homework helper that can summarize lessons, explain concepts, and offer gentle hints instead of giving away answers.
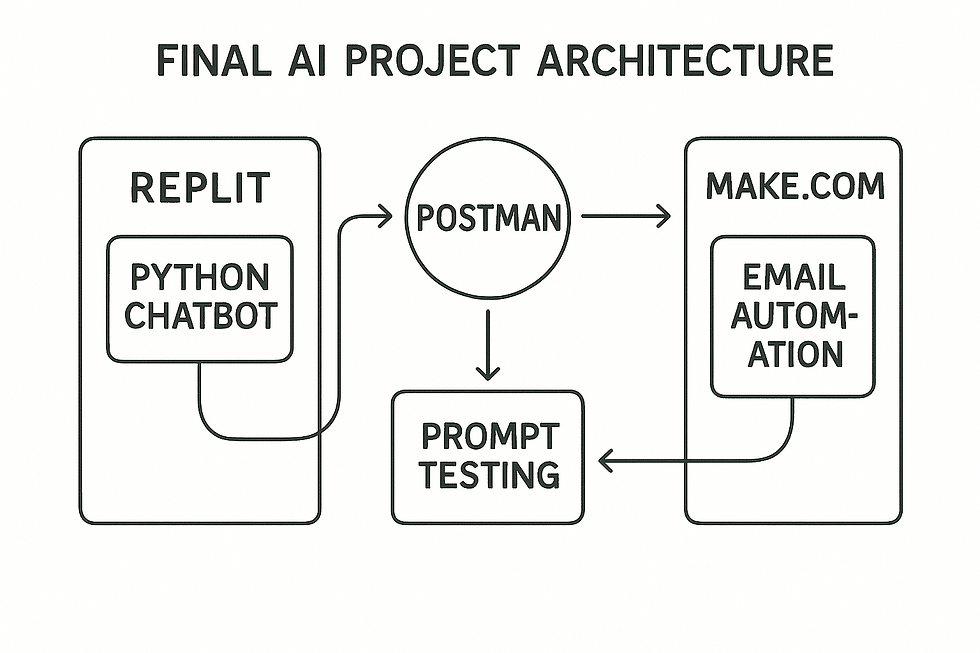
Testing the Prompt in Postman Before Writing CodeBefore writing any Python, I always recommend testing the idea in Postman. It helps you shape your instructions and understand how the AI responds. You begin by creating a POST request to the correct endpoint and adding the headers for authorization and JSON content. In the body, you write something like:
JSON: {
"model": "gpt-4.1",
"messages": [
{"role": "user", "content": "Explain the Pythagorean theorem simply, then give one hint for solving a related problem."}
]
}
When you click “Send,” Postman shows you the AI’s answer, neatly formatted in JSON. You can refine your prompt until the responses match the tone and structure you want for your homework helper.
Building the Chatbot Using Python and the OpenAI SDKOnce you’re happy with the prompt, open a new Python file and write the basic structure of the chatbot. The OpenAI SDK makes this process straightforward. A small function can handle the conversation:
Python: from openai import OpenAI
client = OpenAI(api_key="YOUR_API_KEY")
def ask_homework_helper(question):
response = client.chat.completions.create(
model="gpt-4.1",
messages=[
{"role": "system", "content": "You are a friendly homework helper who summarizes and gives hints without giving full answers."},
{"role": "user", "content": question}
]
)
return response.choices[0].message["content"]
Then you add a simple prompt loop:
Python: user_question = input("What do you need help with? ")
reply = ask_homework_helper(user_question)
print("AI:", reply)
At this point, you have a working homework helper running directly in Python.
Hosting the Chatbot in Replit for Easy AccessNext, you copy your Python script into Replit. This allows your chatbot to run online, making it accessible from any browser. After installing the openai package and pasting your code, you run the project. Replit provides a clean console and an easy way to share the tool with classmates or students.
Automating Email Summaries Using Make.comTo complete the project, Make.com can send homework summaries by email automatically. You create a new scenario that begins with a webhook or schedule-based trigger. When activated, the scenario sends a request to your Replit app or directly to OpenAI with a prompt like, “Summarize today’s homework questions and highlight one strategy students can use to approach them.”
The AI returns its response, and the next module in the scenario sends that content as an email using Gmail. Now your AI homework helper not only answers questions on demand but also delivers daily study summaries to whoever needs them.
By the time students finish this project, they’ve touched every major skill in the chapter: prompt testing, Python scripting, API usage, hosting code online, and building simple automations. They discover that they can move fluidly from idea to execution, using AI as a supportive partner at every stage. And when they see the email summary arrive—generated automatically by a system they built themselves—they understand that they’re no longer just learning about AI. They’re wielding it.
Vocabular to Learn While Learning About Using AI in Coding and Programming
1. API (Application Programming Interface)
Definition: A system that allows different software programs to communicate and share information with each other.
Sentence: The chatbot used an API to send my question to the AI model and return the answer.
2. Endpoint
Definition: A specific URL where an API receives requests and sends back responses.
Sentence: We sent our homework question to the OpenAI endpoint to get an explanation.
3. Request
Definition: Information sent to an API asking it to perform a specific task.
Sentence: The request told the AI to write a summary in three sentences.
4. Response
Definition: The information the API sends back after processing a request. Sentence: The response included the AI’s explanation of the math problem.
5. JSON (JavaScript Object Notation)
Definition: A structured, text-based format used to organize data so computers can understand it. Sentence: The AI returned its answer as a JSON object, which my code easily read.
6. Authentication Key (API Key)
Definition: A secret code that proves you have permission to use an API. Sentence: I couldn’t access the model until I added my authentication key to the header.
7. Parameter
Definition: A value you set in code to control how a function or API behaves. Sentence: Changing the temperature parameter made the AI more creative in its answers.
8. Function
Definition: A reusable block of code that performs a specific task when called. Sentence: Our program used a function to send the user’s message to the AI model.
9. Debugging
Definition: The process of finding and fixing mistakes or errors in code. Sentence: Debugging the script helped me discover that I forgot a comma in the JSON body.
10. Rate Limit
Definition: A restriction on how many API requests can be made in a certain amount of time. Sentence: We hit the API’s rate limit because we tested our chatbot too quickly.
11. Model
Definition: A specific AI system or version you choose to interact with, such as GPT-4.1 or GPT-5.1. Sentence: Choosing a more advanced model made the chatbot’s explanations clearer.
12. Token
Definition: A piece of text (often part of a word) that AI uses to measure input and output length. Sentence: We kept the summary short so we wouldn’t use too many tokens.
13. Script
Definition: A small program written in a language like Python that runs tasks or automations. Sentence: Our script collected the user’s question and sent it to the AI.
14. Workflow
Definition: A series of automated steps that pass information from one tool or action to another. Sentence: The homework helper’s workflow sent the AI’s summary to a Google Sheet automatically.
Activities to Demonstrate While Learning About AI in Coding and Programming
“Test Your Prompt in Postman” – Recommended: Intermediate to Advanced Students
Activity Description: Students use Postman to test simple prompts with no coding required. They visually build a request to an AI model and observe structured JSON responses.
Objective: Introduce students to APIs by having them see how endpoints, headers, and request bodies work in a real tool.
Materials:• Computer with Postman installed• Internet access• OpenAI API key (teacher-managed; never give raw keys to students)
Instructions:
Open Postman and create a new POST request.
Add the OpenAI endpoint: https://api.openai.com/v1/chat/completions.
Add headers for Authorization and JSON content.
Create a simple prompt inside the JSON body (ex: “Tell me a fun fact about space.”).
Press “Send” and inspect the returned JSON.
Students modify the prompt and resend to see how responses change.
Learning Outcome: Students understand how real API requests are structured and see the relationship between header, body, endpoint, and output.
“Build a Tiny Chatbot in Replit”– Recommended: Intermediate to Advanced Students
Activity Description: Students use Replit to write a short Python script that sends a question to an AI model and prints the answer. This shows how coding becomes the “instructions” behind the scenes.
Objective: Give students hands-on experience writing their first AI-powered Python program.
Materials:• Replit account• Python environment• OpenAI API key (teacher-managed)• Starter code provided by the teacher
Instructions:
Create a new Python Repl.
Install the openai package using the shell.
Paste a teacher-provided starter script.
Students edit the “user question” or add their own input.
Run the program and read the response in the console.
Experiment with temperature, max tokens, and different prompts.
Learning Outcome: Students see how Python sends instructions to an AI model and how output can be customized using coding parameters.
“Make.com Automated AI Summary” – Recommended: Intermediate to Advanced Students
Activity Description: Students use Make.com to build a no-code workflow that sends a request to an AI model and emails themselves a short daily summary.
Objective: Show students how APIs enable automation across multiple apps without needing to write code.
Materials:• Make.com account• Gmail account (class-use only)• OpenAI account• Provided workflow template
Instructions:
Create a new scenario in Make.com.
Add OpenAI as the first module and add a prompt such as “Write a daily motivation message.”
Add Gmail as the second module, using the AI output as the email body.
Set the scenario to run on a schedule (e.g., every morning at 8 AM).
Test the workflow and watch an email arrive.
Learning Outcome: Students learn how AI-powered automation works across multiple services, revealing the practical power of APIs.
“AI Function Calling Weather Assistant” – Recommended: Intermediate to Advanced Students
Activity Description: Students explore function calling by using a pre-made script where the AI must call a get_weather function to retrieve actual weather data.
Objective: Help students understand how advanced AI models can run tools and functions inside a larger system.
Materials:• Python or Node.js script provided by the teacher• Replit or local coding environment• Weather API key (OpenWeatherMap or similar)• OpenAI API key
Instructions:
Open the project and examine the function calling section.
Ask the AI: “What’s the weather today in Denver?”
Watch as the AI triggers the function, retrieves real weather, and returns a structured JSON answer.
Students try different cities or adjust the returned JSON format.
Learning Outcome: Students learn how AI can trigger real tools, retrieve live data, and return clean structured outputs using JSON.


Comments